
Step 9
Click on the Insert Action Only Moment button.
Step 10

Click on the link2 part.
Step 11

Click on the support part.
Step 12


Select joint location
Click on the outer face of link2 part.
Step 13


Select Force Direction
Click on the cylindrical shape of link2 and check the force direction.
Step 14


Click on Gravity On and make it off
Step 16

Increase the number of frame
Change Number of frame to 200. Try it with
other numbers and check the results and change the Duration time.
Step 17

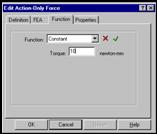
Change the torque to 1000 and try it with other values.
Step 18

Play
Click on the Play/Reset button.
Step 19


Right click on the revolute joint which is between support and link6 part and
Click on projection angle/about Z axis.
Step 20


Click on Export AVI File button, write file name and
click on OK.
The End

| Previous | Next |